or: Cloning Scorsese, the technical part
The ACMI Labs team has recently released on Github the code for the “Scorsese” audio guide web app. They are based in Melbourne, Australia, but this is important for museums all around the world.
In short: thanks to Scorsese and the ACMI team, any museum can now publish a mobile-accessible-user-friendly audio guide, using simple open source tools.
So, practically? How do you do it?
Here’s what we’ve just done for a Brazilian institution (in portuguese):
https://vilaitororo.github.io/bemvindos/
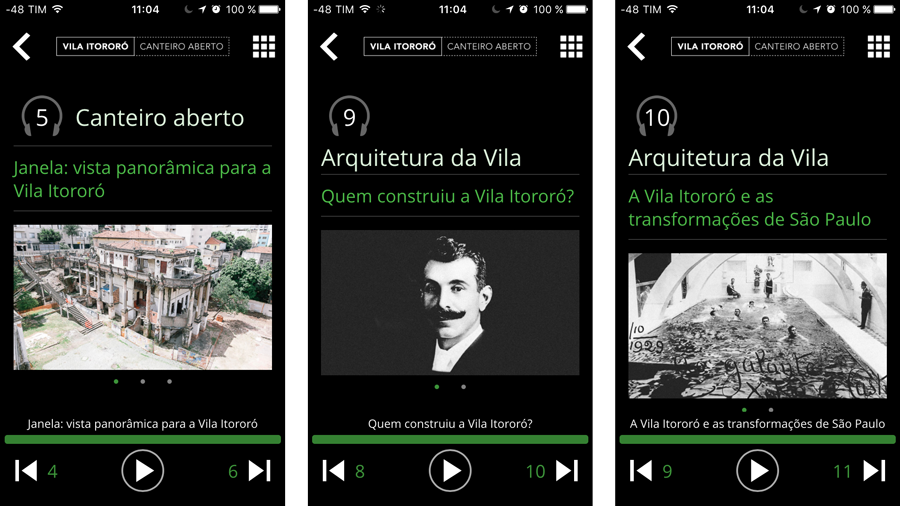
5: Vila Itororó today. 9: Francisco de Castro, who built Vila Itororó. 10: The swimming pool in 1929.
It took about an hour to build 38 stops and another hour to resize some pictures and logos and play around with colour schemes.
The .mp3 audio files were already produced.
Details for each stop were copy-pasted from a spreadsheet, where a simple formula concatenated the stop number, section and stop title in a stop template.
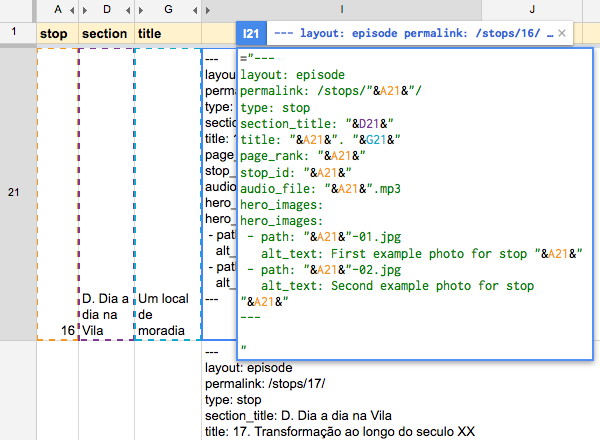
Each stop was saved as .md file, and that’s it.
Step by step and troubleshooting
On a mac, may differ on other platforms.
You’ll need brew
To install, paste that into a Terminal prompt:
$/usr/bin/ruby -e “$(curl -fsSL https://raw.githubusercontent.com/Homebrew/install/master/install)”
If you’ve had it for a while, you may have to run:
$brew update
You’ll need the latest ruby
You probably have the legacy version of ruby that comes with OS X. To find out and upgrade:
$brew install ruby
$brew doctor
Do what you’re told. That may involve chmoding some dirs for your user to get writing privileges or to update your $PATH. It’s not recommended to sudo the commands.
You’ll need jekyll
Simple as:
$gem install jekyll
Once you’re all set, try:
$jekyll new myblog
$cd myblog/
$jekyll serve
That’s it! The prompt will tell you what url to use, in this case: http://127.0.0.1:4000/
What about git?
Git is the version control software you’ll be using to sync files between your development/test machine and the remote server. This is also how you will upload the assets, audio files and images, to the server.
Technically, you can also edit the stops and the styles directly on GitHub, although I’m not sure if you can reference mp3 files hosted somewhere else.
To get started:
- create an account on github
-
open terminal and configure git with:
$git config --global user.name "yourgithubusername"
$git config --global user.email "youremail@yourdomain.com"
-
create a directory
-
cd into this new directory
$git clone https://github.com/ACMILabs/static-museum-audio-guide.git
// The best practice is to fork before cloning, which sets the origin automatically
-
If you want to host your audio guide project on Github Pages (free hosting up to 1Go, terms of use apply), you should rename your repository as “
yourgithubusername.github.io” andhttp://yourgithubusername.github.iowill be the URL to access your audio guide project. -
remove the git folder (you shouldn’t be able to upload to the original source folder anyway)
-
initialize git
$git init
- set the origin folder
$git remote add origin https://github.com/yourgithubusername/yourgithubusername.github.io.git
What you really need to know about git, the 3 commands you’ll use most:
- To sync all files (and remove deleted files):
$git add . --all
- Don’t forget to add a short memo about each update, for example:
$git commit -m "updated the logos"
- To actually do this sync:
$git push origin master
TIP:
In Jekyll’s markdown files (YAML headers), titles can not contain:(a colon).
Therefore, : should be encoded as:(HTML entity).
Someone said you can also use quotes around"your : title"(but this doesn’t work for me).
https://github.com/jekyll/jekyll/issues/549
That’s it.
Now you can focus on producing great content!
Also published on Medium.